はじめに
前回は、Processingでてこクランク機構を作りました。
今回は、スライダクランク機構(Slider Crank Mechanism)を作りたいと思います。
スライダクランク機構とは?
四節リンク機構のどれか一つの回り対偶を滑り対偶に置き換えた機構をスライダクランク機構といいます。ポンプや空気圧縮機、内燃機関、蒸気機関などに利用されます。
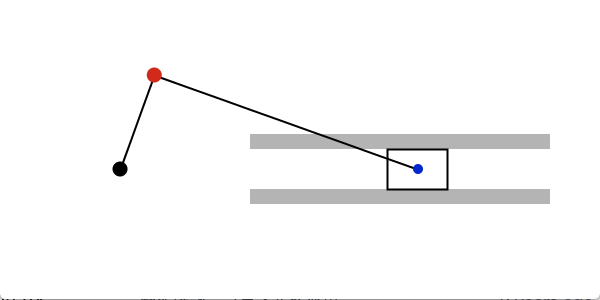
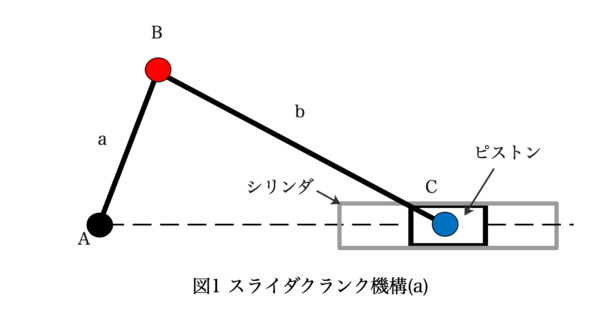
図1において、点Aを中心に点Bが回転運動をすると、点Cが左右に往復運動をします。
点B\((x_b,y_b)\)と点C\((x_c,y_c)\)の位置を求める
Processingにおいて、スライダクランク機構を動かすには点B\((x_b,y_b)\)と点C\((x_c,y_c)\)の位置を求めます。
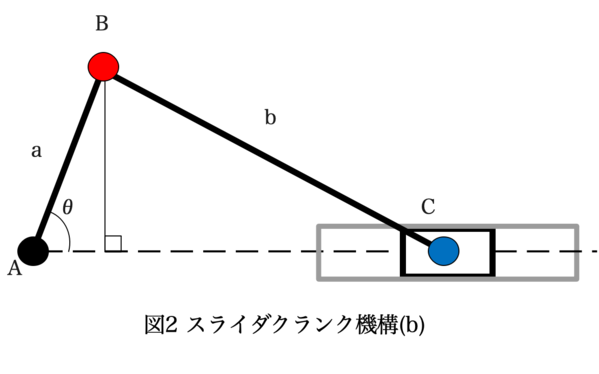
図2より、点Bの位置は
\begin{cases}
x_b=a\cos\theta \\
y_b=a\sin\theta
\end{cases}
点Bより垂線を引くとその辺は、\(asin\theta\)となり底辺をxとすると三平方の定理より
\[b^2=(a\sin\theta)^2+x^2\]
\[x=\sqrt{b^2-(a\sin\theta)^2}\]
よって、点Cの位置は
\[x_c=a\cos\theta+\sqrt{b^2-(a\sin\theta)^2}\]
となります。点Cのy座標は点Aと同じ高さです。
これらの式をProcessingに組み込みましょう。
Processingでスライダクランク機構
メインタブのコードは以下になります。
PGraphics pg1, pg2;
PVector Dot_A = new PVector(120, 170); //点Aを定義
PVector Dot_B;
PVector Dot_C;

float theta = radians(-90);
float r = 10;

void setup() {
  size(600, 300);
  background(255);
  //PGraphicsを生成
  pg1 = createGraphics(width, height);
  pg2 = createGraphics(width, height);
}

void draw() {
  background(255);
  update(100, 280); //辺a=100, b=280
  display();

  //Keyを押したら表示
  if (showDriver) Driver();
  if (showFollower) Follower();
}

void update(float a, float b) {
  //点Bの位置
  float x_b = Dot_A.x + a * cos(theta);
  float y_b = Dot_A.y + a * sin(theta);
  Dot_B = new PVector(x_b, y_b);

  //点Cの位置
  float x_c = Dot_B.x + sqrt(sq(b) - sq(a*sin(theta)));
  Dot_C = new PVector(x_c, Dot_A.y);

  theta += 0.03; //θAを更新して回転
}

void display() {
  //シリンダを生成
  noStroke();
  rectMode(CORNER);
  fill(180);
  rect(Dot_A.x+130, Dot_A.y-35, 300, 15);
  rect(Dot_A.x+130, Dot_A.y+20, 300, 15);

  //リンクを生成
  stroke(0);
  strokeWeight(2);
  line(Dot_A.x, Dot_A.y, Dot_B.x, Dot_B.y);
  line(Dot_B.x, Dot_B.y, Dot_C.x, Dot_C.y);

  //各点を生成
  noStroke();
  fill(0);
  ellipse(Dot_A.x, Dot_A.y, r*1.5, r*1.5);

  fill(209, 41, 26);
  ellipse(Dot_B.x, Dot_B.y, r*1.5, r*1.5);

  fill(0, 40, 205);
  ellipse(Dot_C.x, Dot_C.y, r, r);

  //ピストンを生成
  stroke(0);
  noFill();
  rectMode(CENTER);
  rect(Dot_C.x, Dot_C.y, 60, 40);
}キーボードを押すと運動の軌跡を描くコードは前回を参考にしてください。
アニメーション
実際の動作は以下のようになります。
おまけ:Fusion360でスライダクランク機構
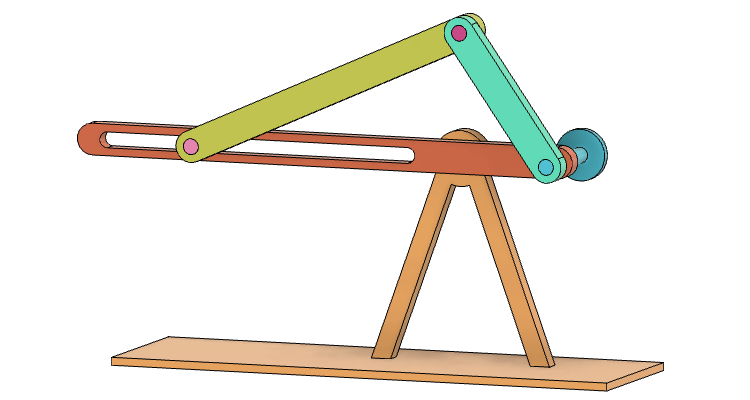
Fusion360でもスライダクランク機構のアニメーションをしてみました。
参考文献
・リンク機構 出典:機械設計法 塚田忠夫等 共著 森北出版株式会社
http://www.ecs.shimane-u.ac.jp/~shutingli/MDE13.pdf
・機構シミュレータMecha Mania 機構学習用テキスト
https://kano.arkoak.com/material/mechanism.pdf
関連記事


コメント