はじめに
Processingで歯車を作りたいのですが、サイクロイド曲線、インボリュート曲線を理解するため、今回はProcessingで直線サイクロイド・トロコイド曲線を作りたいと思います。
直線サイクロイド・トロコイド曲線とは

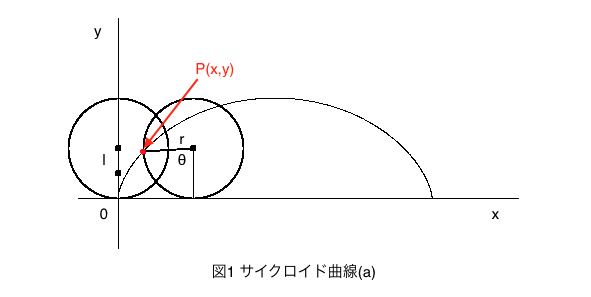
サイクロイド曲線は、動円を基準となる線に沿ってすべらないように転がしたとき、動円上の点が描く軌跡曲線のことです。つまり図1よりr = lの場合です。
トロコイド曲線は、同様にして、動円の内部または外部の点が描く軌跡曲線のことです。
内部のときは、r > l 外部のときは、r < lとなります。
それでは、Processingで動かすために動円上の点、内部または外部の点 P(x,y)の求め方を見ていきましょう。
点P\((x,y)\)の位置を求める

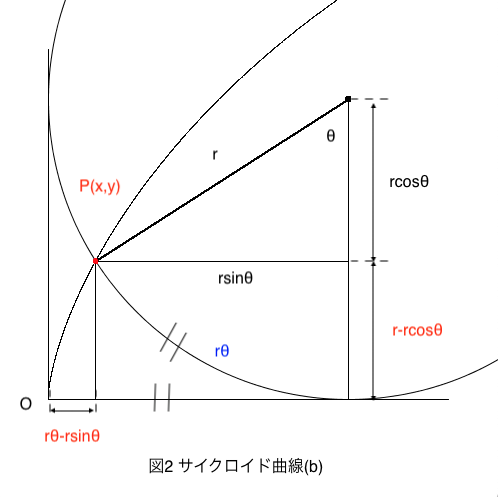
図2より点P\((x,y)\)の位置は
\begin{cases}
x=r(\theta-\sin\theta) \\
y=r(1-\cos\theta)
\end{cases}
また動円上の点を\(l\)とすると
\begin{cases}
x=r\theta-l\sin\theta \\
y=r-l\cos\theta
\end{cases}
となります。
動円の\(x\)座標の重心位置は\(r\theta\)となりますので、Processingで動円を動かすためには
void Circle() {
  //円
  fill(255);
  ellipse(r+r*radians(rad), -r+200, r*2, r*2);
}
としました。
点P\((x,y)\)の座標が分かったのでProcessingで動かしてみましょう。
Processingで直線サイクロイド・トロコイド曲線
以下がProcessingで直線サイクロイド・トロコイド曲線を動かすコードになります。
理解しやすくするためにボタンも実装してみました。
PGraphics pg1, pg2, pg3;
float x, y;
float rad = 0;
float r = 40; //半径
float l;
boolean Cyc1 = false;
boolean Cyc2 = false;
boolean Cyc3 = false;
boolean roll = false;

void setup() {
  size(600, 300);
  //PGraphicsを生成
  pg1 = createGraphics(width, height);
  pg2 = createGraphics(width, height);
  pg3 = createGraphics(width, height);
}

void draw() {
  background(230);
  stroke(0);
  line(0, 200, width, 200); //水平線
  Button();
  if (roll) Roll(); //回転
  if (Cyc1) Cycloid1(); //直動サイクロイド(r=l)
  if (Cyc2) Cycloid2(); //直動トロコイド(r>l)
  if (Cyc3) Cycloid3(); //(r<l)
}

void Button() {
  fill(255);
  rect(10, 10, 60, 30);
  fill(255);
  rect(50, 250, 100, 40);
  rect(250, 250, 100, 40);
  rect(450, 250, 100, 40);
  fill(0);
  textSize(16);
  textAlign(CENTER, CENTER);
  text("roll", 40, 25);
  text("r = l", 100, 270);
  text("r > l", 300, 270);
  text("r < l", 500, 270);
}

void Circle() {
  //円
  fill(255);
  ellipse(r+r*radians(rad), -r+200, r*2, r*2);
}

void Roll() {
  rad++;
}

void mouseClicked() {
  if (mouseX>=50 && mouseX<=150 && mouseY>=250 && mouseY<=290) {
    Cyc1 = !Cyc1;
    rad = 0;
  }
  if (mouseX>=250 && mouseX<=350 && mouseY>=250 && mouseY<=290) {
    Cyc2 = !Cyc2;
    rad = 0;
  }
  if (mouseX>=450 && mouseX<=550 && mouseY>=250 && mouseY<=290) {
    Cyc3 = !Cyc3;
    rad = 0;
  }
  if (mouseX>=10 && mouseX<=70 && mouseY>=10 && mouseY<=40) {
    roll = !roll;
  }
}

void Cycloid1() {
  Circle();
  x = r + r*radians(rad) - r*sin(radians(rad));
  y = -200 + r - r*cos(radians(rad));
  pg1.beginDraw();
  pg1.noStroke();
  pg1.fill(209, 0, 0);
  pg1.ellipse(x, -y, 5, 5);
  pg1.endDraw();
  image(pg1, 0, 0);
  //円の中心とサイクロイド曲線上の点を結ぶ線分
  line(r+r*radians(rad), -r+200, r+r*radians(rad) + r*sin(radians(-rad)), -r +200+ r*cos(radians(-rad)));
}

void Cycloid2() {
  Circle();
  l = 20;
  x = r + r*radians(rad) - l*sin(radians(rad));
  y = -200 + r - l*cos(radians(rad));
  pg2.beginDraw();
  pg2.noStroke();
  pg2.fill(0, 40, 205);
  pg2.ellipse(x, -y, 5, 5);
  pg2.endDraw();
  image(pg2, 0, 0);
  line(r+r*radians(rad), -r+200, r+r*radians(rad) + l*sin(radians(-rad)), -r +200+ l*cos(radians(-rad)));
}

void Cycloid3() {
  Circle();
  l = 80;
  x = r + r*radians(rad) - l*sin(radians(rad));
  y = -200 + r - l*cos(radians(rad));
  pg3.beginDraw();
  pg3.noStroke();
  pg3.fill(74, 170, 64);
  pg3.ellipse(x, -y, 5, 5);
  pg3.endDraw();
  image(pg3, 0, 0);
  line(r+r*radians(rad), -r+200, r+r*radians(rad) + l*sin(radians(-rad)), -r +200+ l*cos(radians(-rad)));
}
アニメーション
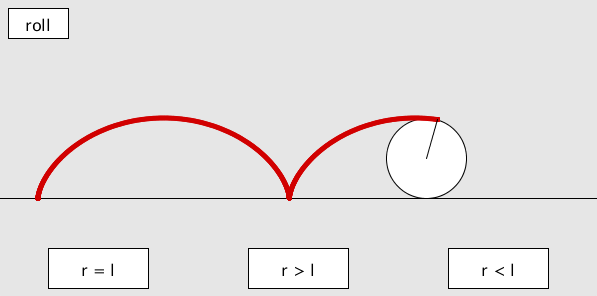
実際の動作は以下のようになります。
参考文献
・物理のかぎしっぽ-サイクロイド
http://hooktail.sub.jp/mathInPhys/cycloid/
関連記事

Processingおすすめ本
Processingのおすすめ本を紹介します


コメント